Products You May Like
Everyone in the gym has their own ideas about ab training. And the majority of people seem to hate it. It’s the one thing most lifters leave to the end of their workout in favor of movements for other body parts, if they bother to train their core at all.
People often neglect core training because it can be grueling, boring, or just plain difficult. But it doesn’t have to be any of that. Simple and effective core training starts with the basics. When it comes to simple core training, it’s hard to beat what’s arguably the most ubiquitous of all core exercises in the gym, the classic plank. But when it comes to being both simple and effective, take the plank to the next level.
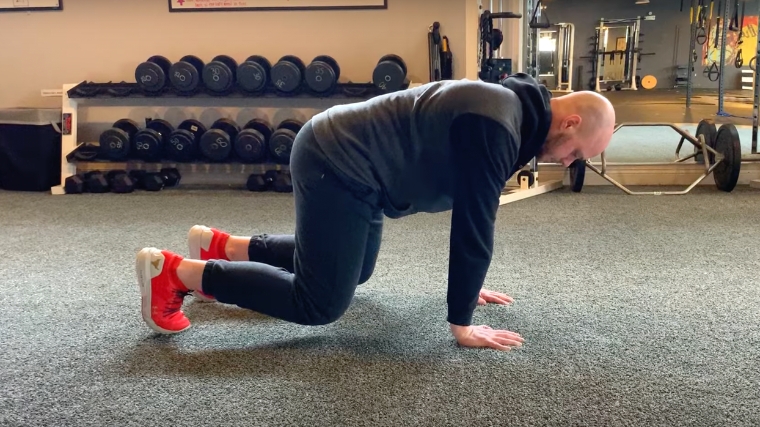
Enter, the bear plank. This upgraded plank position is both easier to learn than the classic and it hits your core harder. Here’s how to get a win-win for your core workout.
Bear Plank
How to Do the Bear Plank
The bear plank, or bear-stance plank, refers to holding a ground-based position using straight arms and bent legs, rather than straight arms and straight legs (like a standard plank position). Your weight is supported on your hands and toes, with no other bases of support, but your legs are bent and your knees are very slightly above ground-level.
Step 1 — Hands, Knees, and Toes
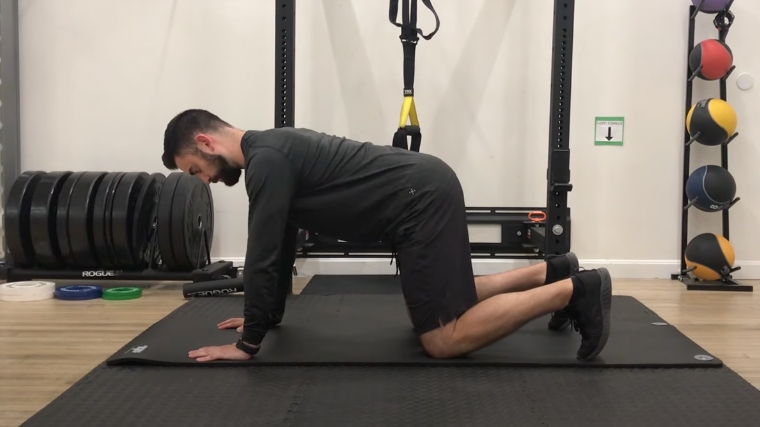
Get on the ground and support your body with your hands, knees, and feet. Set your hands directly under your shoulders, not in front or behind them. Place your feet hip-width apart.
Get an approximate 90-degree joint angle at your knees. If your legs are too bent, the movement won’t be challenging enough and you’ll risk resting your knees on the ground. If your legs are too straight with your knees behind your hips, you’ll end up looking like a poorly performed standard plank, which defeats the purpose of the exercise.
Form Tip: Your overall position should be comfortable, square, and balanced. Take the time to check the position of your hands, shoulders, knees, hips, and feet. Look directed down to the ground or slightly in front of your hands. Cranking your head to look forward will only stress your neck.
Step 2 — Lift Your Knees and Brace
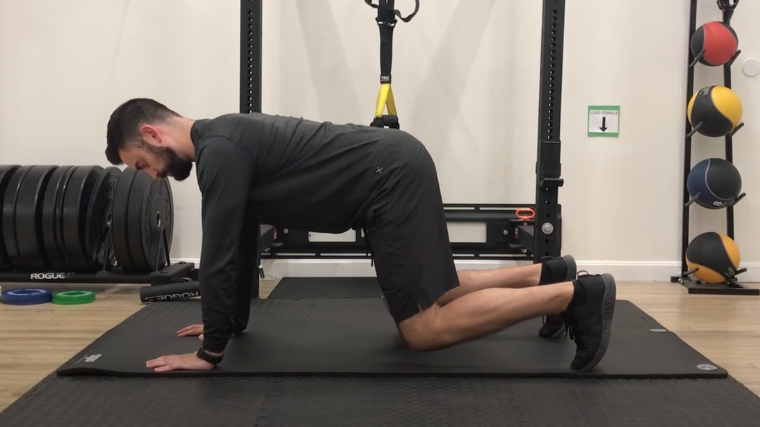
Bring your knees just a few inches off the ground and keep them in line with your feet. Don’t let your shins or knees wobble in or out of alignment. Flex every muscle from your toes to your wrists. Although this is a core-focused exercise, the more muscles surrounding the core you can also contract to promote stability, the better. (1)
Squeeze your quads, glutes, and hips. Think about driving your hands and feet into the floor as hard as possible without actually raising your body. Keep your knees off the ground and maintain complete tension for the duration of each set.
Form Tip: Don’t only focus on flexing your abs. Achieving full-body tension will contribute to a better quality bear stance which will make the movement harder and require more effort, which can yield better results.
Bear Plank Mistakes to Avoid
Even though the bear plank is a static exercise with no “moving parts,” there are still some common technique errors that will prevent maximum tension or limit progress.
Poor Knee Position
When your knees are touching the ground, your body has very little need to stabilize, so you’re not actually performing the exercise. Keeping your knees elevated also helps to maintain a strong hip position and prevent back rounding. This can also help maintain tension through your hamstrings, glutes, core, and trunk.
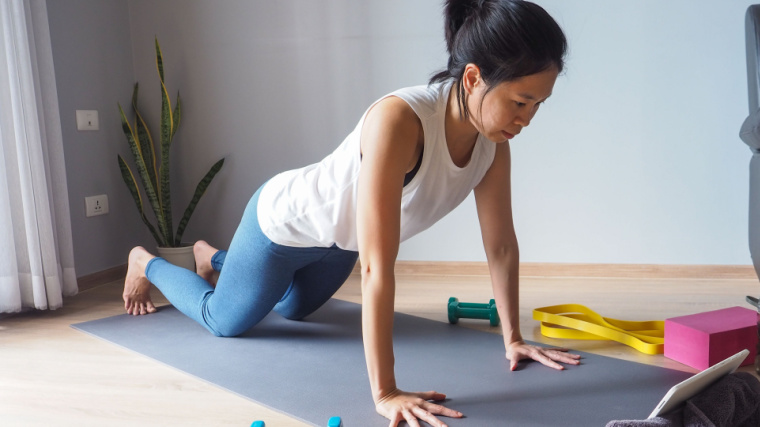
Avoid it: Set your knees directly under your hips or tailbone, not far back in a nearly straight position. When you begin the exercise, imagine having a tray of wet paint appear under your knees. Stay tight, stay focused, and keep your legs clean. If your knees dip down into the “paint,” end the set, rest briefly, and try again.
Bending Your Arms
The fully supported bear plank position uses your fully straightened arms to support your upper body while your lower body is supported by bent legs. Bending your upper arms changes the overall angle of your torso and alters your center of gravity.
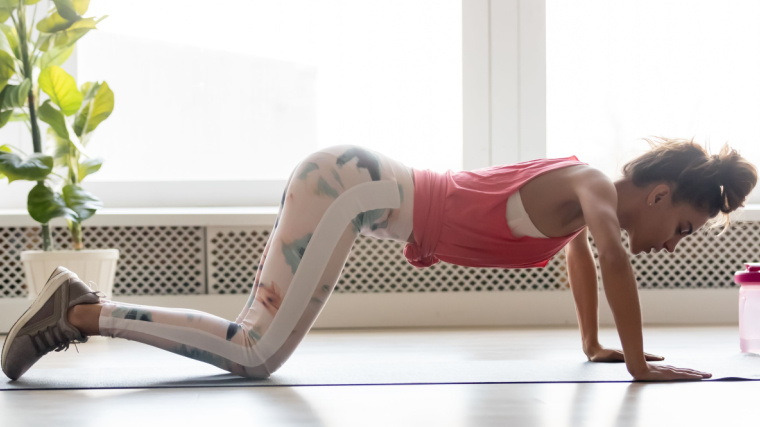
This makes the exercise less effective overall and emphasizes the relatively smaller muscles of your arms and shoulders to support the majority of your body’s weight, compared to dispersing the tension throughout your entire body.
Avoid it: Keep your arms locked straight during the exercise. If your shoulders or triceps fatigue excessively, end the set. Over time, your muscles will adapt by building strength and endurance to support the position.
How to Progress the Bear Plank
The bear plank is a relatively a simple movement, so the natural inclination of a lifter would be to seek ways to make it more difficult once they’ve “graduated” from the basic execution.
Add a Weight Vest
Adding a weight vest creates a heavier load to bear when in position, requiring even more from the trunk for stability and positioning. However, the typical weight distribution of a standard weight vest (with the weighted inserts often placed around the midsection) creates even greater temptation for the spine to slip into an arched or extended position. That means more reliance on your abs to negate this repositioning and keep your spine flat.
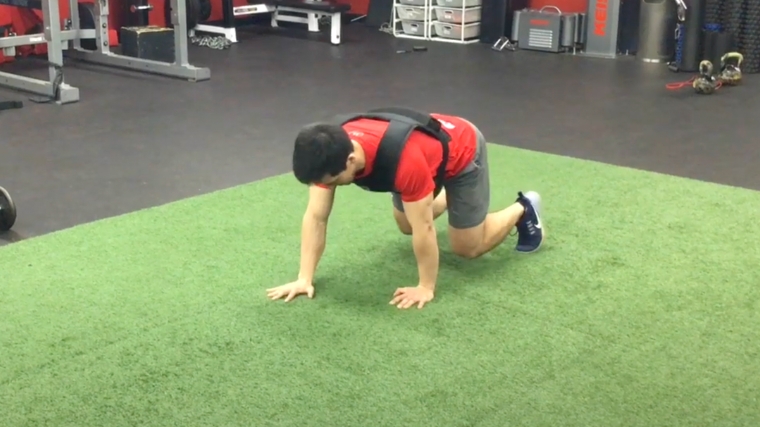
Keep in mind that using a weight vest usually goes hand-in-hand with reducing the amount of time spent in the plank position. Focus on high-quality performance rather than just achieving long durations.
Shoulder Taps
In the typical bear-stance plank, there are four points of contact with the floor — two hands and two feet. That means forces are distributed evenly among all those points. As soon as one of those points of contact leaves the floor, there are added demands on the body to resist changing position to compensate for reduced stability. In the bear plank, these are rotational forces and resisting them would be termed “anti-rotation.”
Since a massive function of your core is to brace and work against unwanted outside forces, the simple shoulder tap is a great way to train anti-rotation from a bear stance. Work hard to stay square and keep your back and trunk parallel to the floor without twisting or shifting. Try sets of 12-20 shoulder taps, alternating hands as you go along. Remember to move slowly with control.
Bear Dogs
Assuming a bear-stance starting position allows you to maintain a much more neutral spine when in starting position, as previously discussed. The basic bird dog exercise is a core stability movement that many lifters can master, but taking things to the next level involves some strategy. Bear dogs are a smart modification that provide all of the benefits in blasting contralateral stability (coordinating left and right limb movements).
Keep sets very low-rep, such as three or four reps per side. Instead of progressing with higher reps, opt for more total sets. This ensures you can focus on high-quality repetitions while avoiding too much fatigue which would prevent good performance.
Benefits of the Bear Plank
The bear plank, like all types of plank exercises, can be a top-level core strengthening drill. The total-body tension and abdominal activation can carry over to provide stability in other strength-focused exercises.
Better Ab Recruitment
The bear plank works well as a modification or alternative to basic planks, while being much more effective in targeting the abs due to simple changes in positioning. The abs are much more difficult to fully engage in a classic plank due to the long-legged position. Everyone naturally has a slight arch (lordotic curve) in their lower backs, and it’s especially present when standing up straight. The same issue applies when we get into a typical plank position.
However, when sitting down, it’s a lot harder to maintain the same degree of back arch. When you’re bending your knees to sit down, your pelvis tends to rotate “under” your body into more of a posterior tilt, making the spine exit extension and edge toward neutral or even a flexed position — that’s part of what makes you “slouch” when you sit.
Using that to our advantage can go a long way in its efficacy for core training. While it can be tough to keep a flat spine using a classic plank, opting for the bear plank almost ends up mimicking a seated position while kneeling. This change in knee angle also affects your pelvic position and brings your lumbar spine into a much more neutral state, which is great news for targeting and activating your abdominals. (2)
Simplified Technique
The bear plank is both a more challenging plank modification because it hits the abs harder than most other plank variations will. Fortunately, it’s also a less challenging modification because it’s relatively easier to perform for most lifters.
A lifter looking to take their core training game to the next level of quality and effectiveness can’t go wrong with the bear plank. Doubling down on the exercise by applying the advanced methods listed later in this article will be gold for keeping your training interesting while providing a continued challenge to trunk strength and stability.
Muscles Worked by the Bear Plank
Any exercise in the plank family will first and foremost target your core muscles. The bear plank, specifically, recruits these crucial stabilizing muscles better than many other exercises due to your overall body position.
Rectus Abdominis
When all four limbs are on the ground, the bear plank primarily focuses on the rectus abdominis muscles — the body part that most people reference when they say “six-pack”. The goal of the exercise is to keep the strength of the muscular contraction consistent and high-intensity.
Transverse Abdominis
The transverse abdominis is the “inner layer” of the abdominal wall. During the bear plank, or any high-effort core bracing, your transverse abs will be firing at maximum capacity to provide stability to your entire trunk, like beams of a house giving stability to the outer framework.
Obliques
Your obliques, on the sides of your abdominals, are responsible for rotating your trunk and thoracic spine, as well as resisting rotation. During the bear plank, your obliques are activated to help prevent tipping over sideways.

Anytime you lift a hand or foot during any anti-rotational bear plank variations, your obliques take on significantly more work. They will be asked to isometrically contract to keep the core from twisting out of position.
How to Program the Bear Plank
The bear plank can be plugged into any number of workout programs, either as a warm-up and activation drill, a focused core training exercise, or as part of a conditioning workout.
High Intensity for Time
The bear plank, and all plank variations, are somewhat unique to other exercises you can perform because they’re typically not done for multiple repetitions. Instead, focus on achieving maximum tension from head-to-toe and holding that tension for a specific time — using your phone’s timer feature comes in real handy for this. Aim for anywhere from five to 30 seconds of fully flexed tension for two to five sets.
Just like you “shouldn’t” use poor form to squeeze out a few extra reps of squats, you shouldn’t allow yourself to gradually apply less and less tension as a set goes on just to hit a pre-set time limit. When you feel the focused tension falling less than 100%, stop the set, rest, and do another.
Variations of the Bear Plank
Once you’ve mastered applying full-body tension with the bear plank, you can adapt that skill and conditioning to other exercises for a variety of results.
Classic Plank
As popular and common as the plank exercise is, the interesting truth is the fact that many people perform it poorly. Positioning the body on your elbows and toes has proven to be a slightly more demanding task than meets the eye, especially with form cues to ensure your abs are working their hardest. For starters, it’s important to remember that the abdominals posteriorly tilt the pelvis.
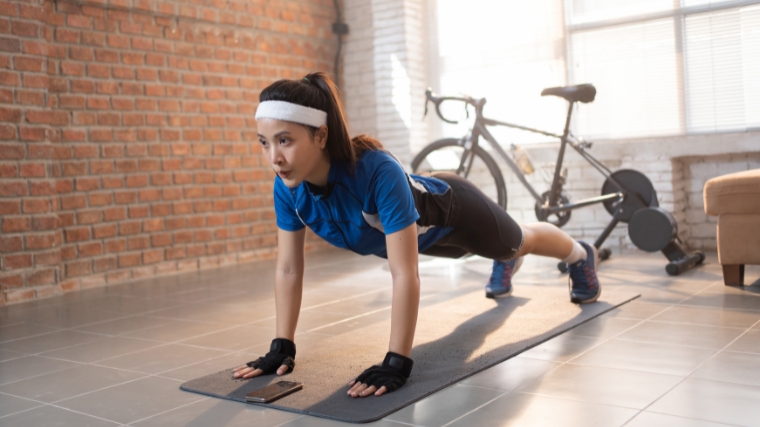
That means keeping your back flat with your butt squeezed and “tucked in” is far superior to keeping your back slightly (or generously) arched. Doing the latter will negate the purpose of the exercise.
Actively “pull inward” with your elbows in an attempt to move your ribcage down toward the hips. This keeps your core braced while contracting as hard as it can. This is an important cue, as it’s really easy to “hang out and chill” when performing a plank, enabling someone to stay in position for minutes on end. It’s much more effective to hold an intense contraction for 30 seconds or less, than to hold a poor quality position for three, five, or 45 minutes.
Bear-Stance Renegade Row
Doing renegade rows from a bear-stance position isn’t only harder and more intense for the abs, it’s also an easier way for you to assume the right lumbar (lower back) posture. Your pelvis enters anterior (forward) tilt and your body has to find a way to keep your glutes and lower abs engaged enough to overcome this. This isn’t easy in the presence of fatigue.
Making the switch to bent knees with tilt your pelvis posteriorly (backward) just enough to enforce a neutral spine, potentiating more lower ab involvement while leaving the glutes less involved. If the goal is core training, this is an ideal “gym hack.” The inclusion of the row pattern (which shouldn’t use a very weight) will also train your upper back to address posture, strength, and development.
FAQs
Because the bear-stance plank puts your hips in a more efficient position, it can be a better starting point for many lifters. It’s also relatively harder to “cheat” during the bear plank, unless you rest your knees on the ground or stand up too high.
With the standard plank, it’s common to see lifters dropping their hips and creating a U-shape with their body, losing tension throughout their core. Either movement can be effective when done properly, but it can be redundant and inefficient to perform them both in the same workout.
Apply the same principles as any bodyweight exercise — when your current programming (sets and duration) are no longer challenging, you can add a small load to increase the difficulty. With the bear plank, that could mean adding a very light weight vest when you can perform multiple sets of 20 to 30 seconds while maintaining high tension for the duration.
Just like you might go from a set of 12 bodyweight pull-ups to a set of three weighted pull-ups, don’t be surprised if you drop from 30 seconds of unweighted bear planks to sets of five seconds with a weighted bear plank.
Get Down, Knees Up
There are hundreds of abdominal and oblique-focused exercises that might help a lifter get stronger and more conditioned, but it doesn’t have to get too fancy. Taking a basic plank and turning it into a bear-stance can be all that’s needed to step your training up a notch or two. Exercise doesn’t need to be complicated for good things to happen — quality is king. The bear plank is a great example of emphasize simple and effective training being the path to better results.
References
- Gontijo, L. B., Pereira, P. D., Neves, C. D., Santos, A. P., Machado, D.deC., & Bastos, V. H. (2012). Evaluation of strength and irradiated movement pattern resulting from trunk motions of the proprioceptive neuromuscular facilitation. Rehabilitation research and practice, 2012, 281937. https://doi.org/10.1155/2012/281937
- Workman, Chad & Docherty, David & Parfrey, Kevin & Behm, David. (2008). Influence of Pelvis Position on the Activation of Abdominal and Hip Flexor Muscles. Journal of strength and conditioning research / National Strength & Conditioning Association. 22. 1563-9. 10.1519/JSC.0b013e3181739981.
Featured Image: Susan Niebergall Fitness / Youtube
